Chemistry of Food and Cooking "The Perfect Craft Mac"
|
Perfect Kraft Macaroni
Amount of servings: Serves 2-3 Ingredients
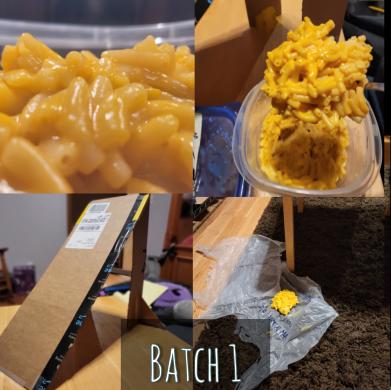
Recipe Steps Start by gathering the needed cooking utensils and containers for this recipe. This includes a medium size pot, noodle strainer, cheese grater, measuring glass that can hold up to 4 cups, and a silicone spatula. A 4 cup measuring glass is recommended for efficiency, however a 2 cup measuring glass will work. To start, measure out 6 cups of water and add it to your pot, then set the pot over a stove top at a medium to high heat. After roughly 5 minutes or until the water just starts to boil, stir in your wheat noodles. Let the noodles settle and then stir them every now and again to prevent clumping. After 6 to 8 minutes, the water should be boiling, and the noodles should be soft and fully expanded. If not, you can continue to stir the noodles and let them soak for a few more minutes until you’ve reached your desired consistency. Place the strainer in the sink, take your boiling noodles off the stove top and pour them gently into the strainer. You can shift the noodles around to drain the water faster, but it is not a necessity; the noodles should be mostly drained after 5 minutes. While the noodles are draining, you can make your cheese sauce. Note: In the past, I've had difficulties making my sauce in a separate pan/pot and then adding it to the macaroni as the standard recipe calls for. A lot of the sauces would be left in the other pot, and it wouldn’t mix well with macaroni given that it’s cold. Instead, I modified this process of making the sauce which is the secret to making your perfect Kraft mac and cheese. Take the same pot you boiled the noodles in, and add your powdered cheese, 2 liquid ounces or .25 cups of milk, and shred half an ounce of cheddar cheese into the mix. Put it on a stove top at a low heat and stir the mix until it is one solid shade of yellow, and has a cream-like consistency. Take your strained noodles out of the sink and gently dump them into the pot you just made your cheese sauce in. Still on a low heat over the stove top, start to gently stir your mac and cheese. Finally, add 2 tablespoons of butter to your mac and cheese, and stir until the butter is melted and the sauce is mixed well. Serve and enjoy. What I Changed The experiment I tested consisted of two different batches of mac and cheese. The first batch was cooked and prepared following my “perfect” recipe, and the second batch was cooked the same but with the exclusion of milk. I was looking to see how this affected the coloration and texture of the macaroni in contrast with the regular batch. The method I used for testing the texture involved having a 2 ft long ramp angled at 45 degrees off the ground. I placed a heaping spoonful of each mac and cheese at the top of the ramp and timed how long it would take for each clump to roll down. The first batch of mac and cheese was cooked using my modified recipe as seen above. The coloration was a light yellowish orange, and had the same appetizing appearance of your typical Kraft macaroni. I took out a spoonful, and it was soft, malleable, and a little sticky. A clump of this macaroni took 1 minute and 12.6 seconds to roll down the ramp. The second batch of macaroni was cooked using the same recipe as before except with the exclusion of milk. This macaroni had a slightly darker orange tint; almost richer coloration. And small clumps of un-melted cheese can be seen throughout the noodles. I wouldn’t say this is unappetizing, but if I was served this at a restaurant I would be concerned. When it came to getting a spoon full from the first batch, it separated nicely with strands of cheese flowing off the clump. As for this one, almost the entire batch was lifted out of the container as seen to the right. It had the consistency of old rubber, and it bounced a little when I set it back down. As for the experiment, it took the clump 1.138 seconds to roll down the ramp. This mac and cheese was bone dry. And the cheese sauce acted more as rubber cement rather than a sauce. There were a few other things that were altered in the recipe to make the macaroni the best it could be. The first and most significant one being the method of adding in the sauce to the macaroni. The original recipe and most recipes for that matter, instruct that you make the sauce in a different pan and then add it to macaroni after you’ve strained the noodles. The problems that come with this is that a lot of the sauce is lost when trying to make that transfer, through pan residue and the utensils. And by that point the sauce is cold and won’t mix well with the noodles. The way I changed this step is by straining the noodles and then making the cheese sauce in that same pot on a low heat. This way the sauce is still hot and malleable, and the noodles can be poured on top of the sauce; they will mix evenly and thoroughly with the sauce. Another changed component is the added half ounce of grated cheddar cheese. This adds thickness and gooiness to the cheese sauce as opposed to the regular cheese powder which makes the sauce too runny and bland. Both of these methods and add-ons combined forge an impeccable Kraft macaroni recipe. Science of Mac and Cheese I was most interested in altering the milk in the recipe, because dairy products add creaminess to foods and mixtures, commonly being used in pastas for that reason. Because starch is washed off from the pasta noodles when they’re boiled. And those starch particles are absorbed into the milk which increases its solid content. Giving the cheese sauce a creamy, slightly foamy texture. This happens because starch is a very strong carbohydrate, and carbohydrates solidify liquids through stripping a liquid of its hydrogen atoms and replacing it with the new starch mixture. The exclusion of milk will cause the macaroni to be thicker, and more specifically have a thicker sauce because the extra starch particles washed off from the pasta. This extra starch will be absorbed into the noodles, excess water, the cheese, butter, etc., m Making the melted cheese thicker and denser given the absence of the milk for the starch to mix with. Personal Preferences and Discoveries Whether you have a lot of cooking experience or not, you’ll start to develop different methods and add-ons to recipes as you become comfortable with them. For example, you’ve been following the same recipe for a beef and vegetable roast for a year. Maybe one night you think to yourself that it is in fact good, but it could do with a bit less oil. Or maybe it would be better with this vegetable combo instead of the recipe based one. As you get more comfortable with cooking and preparing ingredients, you’ll find yourself having the knowledge and experience to alter recipes. You’ll see recipes less as step by step instructions, and more so templates for a recipe accustomed to you. For me this would be the added ingredient of fresh cheddar cheese and the method of preparing/adding the sauce to the noodles. Or every now and again, I’ll add a few more tablespoons of milk if I want my macaroni a bit runnier. I found these tweaks to be beneficial for the recipe, and I discovered them through pure trial and error. I don’t believe there is a video you can watch or book you can read that will grant you the comfort of an experienced cook. Sometimes you have to crack a few eggs. |

|
How does the ingredient you experimented with affect the food’s overall characteristics?
Although I was only calculating texture and visual coloration, there were several more attributes to the mac and cheese that might not have been documentable through numbers, but definitely observable. Such as taste, texture/feel through eating the two samples, and how appetizing the two samples looked. But the reason I chose milk as the independent variable is because it affects more attributes of the mac and cheese than any other ingredient. Milk is a carbohydrate with the chemical formula of C12H22O11. Milk is mostly water, lactose, fat and protein, providing great moisture and nutrition to the macaroni. I’ve tried and trust me, you'd need to be a sociopath to enjoy dry mac and cheese.
Some would argue that altering the cheese would affect it the most, to which I'd say, “You can’t have mac and cheese without cheese smartass”. But as I’ve mentioned before, milk is the cornerstone to a good, if not great macaroni dish. It reduces the solid content of the noodles so they all don’t stick into one massive clump. It allows the washed off starch from the noodles to be absorbed to mildly solidify the cheese sauce and not take moisture from the noodles. And it allows the cheese in the mixture to melt and mix evenly throughout the sauce. Over all, making milk the most vital ingredient to mac and cheese. Which is why I decided to alter it and document the effects that it has when it is taken out entirely.
In what ways are cooking and doing science similar and in what ways are they different? How are a cook and a food scientist similar or different?
Cooking and Science are both trial and error based. Over the course of human evolution, we had to find what works through finding what didn’t work. We didn’t automatically know what mixture would make the most efficient rocket fuel, much like how we didn’t automatically know what would happen if we used poison oak in a salad. Depending on the answer we’re looking for or a specific answer we're trying to get. We start off with several questions, and obtain several answers over time that will narrow us down to the correct or most suitable answer.
One major way that cooking and science are different is precision of calculation. An experienced chef may reach a point of comfortability where he no longer needs measuring cups and spoons, and he can “eyeball” the right amount of each ingredient. But in the world of science, estimation isn’t acceptable. Some of the demos that Steve has performed, he’s been showcasing for years. But that doesn’t mean he can just eyeball how much gun powder he throws into a beaker of burning petrol because of how comfortable or experienced he is with the experiment. There needs to be precise measurements and calculations to find an answer, or in the process of creating something in science. And even if a chef measures out all of his ingredients for a dish precisely, there are still other factors that would make their process of cooking defective. One day they use a clean edge vegetable knife to cut their ingredients, and the next day they use a serrated bread knife to cut the same ingredients. Even if one couldn't tell the difference visually or through taste, the process and execution was different on both days, so the results must be different.
Steel Production and School Implication
|
Steel Background Information
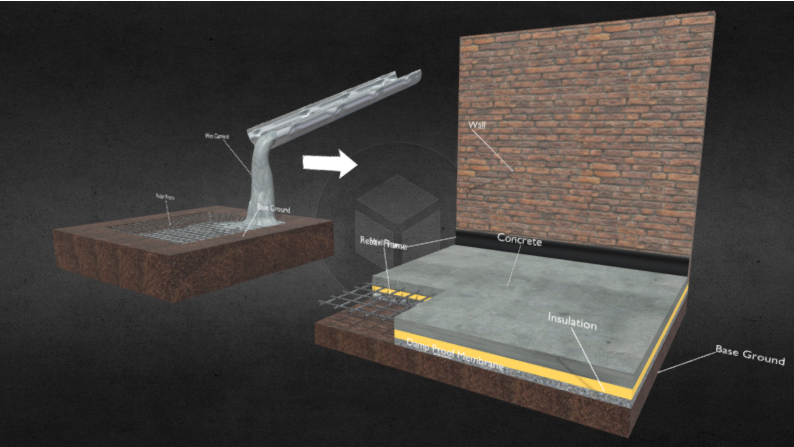
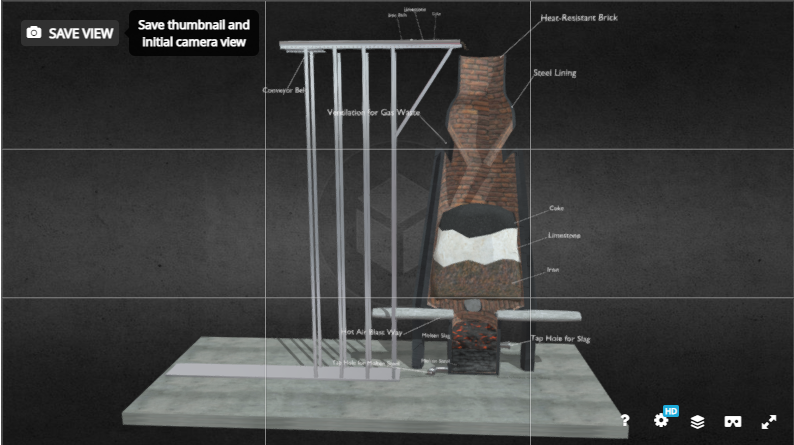
When it comes to producing high quality, durable steel. There are a multitude of steps and hours of processing that go into the production. And as for plain carbon steel, these are the primary steps in the process of turning raw iron into this highly durable alloy. Iron ore is mainly blasted out of the ground through a sequence of dynamite explosions precisely placed in an iron rich mining area. Once the dynamite is detonated, the earth is upturned and the ore is collected into large haul trucks and taken to processing plants. Where the ore is first crushed and grinded down until each piece of iron ore is the size of a marble. Then the ore is dumped into a rotating mill and mixed with water. The ore is ground finer in the mill’s chamber until it is a fine powder. The iron powder is still full of hematite/rock and needs to be separated from the iron. Once all of the moisture evaporates from the powder mix, the iron is separated through magnetism leaving the rock and impurities. Iron powder by itself is too light to be smelted in a blast furnace; it would only be blown out. And it wouldn’t mix evenly or efficiently with the other compounds it’s smelted with. The iron extracts are poured into a rotating cylinder and mixed with a little bit of clay. The powder will begin to form and role into a bunch of tiny iron balls. They are heated up to 2000 degrees Fahrenheit, and then are given time to cool and solidify. The end product is a vast ocean of tiny iron pellets that are 65% to 70% iron. These pellets composed of mostly iron and clay will smelt efficiently in the blast furnace. The steel pellets are shipped off by rail or boat to steel mills across the country. The other two ingredients needed for producing steel are coke and limestone. Coke is the fuel added to the furnace to generate immense heat, and lowers the melting point of the iron. It also introduces carbon to the molten iron, which turns into molten steel. And the limestone added is to extract any remaining impurities from the iron in the smelting process. Coke is a very useful ingredient in smelting quality steel. It begins as coal that is crushed down into powder and smelted at high temperatures in a furnace for up to 18 hours. This long process strips away oxygen and impurities from the coal, creating a pure carbon fuel source. Steel mills have been using coke as a fuel source in smelting for over a century since its creation in 1920. Coke burns at much higher temperatures than coal and produces less smoke when combusting. Making it a more efficient and bio-friendly fuel source. Step One: Smelting the Iron Ore The iron pellets, limestone, and coke are poured into the blast furnace to be smelted. Hot air, preheated through a process of gas combustion is blasted into the furnace at 2300 degrees Fahrenheit. Once the coke is heated to a high enough temperature, it will combust and heat the blast furnace even further to an upward of 3000 degrees Fahrenheit. Once everything is settled entirely, a layer of slack rests on top of a body of molten steel. From there, the slack is removed from the surface, and the molten steel is poured out of the bottom of the furnace. And into submarine ladles where the steel will be transported to another blast furnace to be resmelted, and cast into giant steel ingots. When it comes to modern production of carbon steel, the entire process is untouched by human hands. From the time Iron pellets are transported to the plant, to then becoming sheets, ingots, and poles of steel ready to order. Approximately 250 tons of steel is produced within 45 minutes in steel mills across the nation. Step Two: Casting Once the molten steel is taped out of the furnace and into the submarine ladle, it is degassed of any trapped or dissolved gasses in a vacuum degasser. The primary gases being hydrogen, nitrogen, and carbon monoxide. With all of the gases extruded out of the molten metal, it will now be highly formable and less prone to mistempering in the casting process. Degassing is important because oftentimes residue of the produced gases during smelting still remain within the molten steel. And if left mistreated, it will create pores of entrapped air once casted into a slab. Which could cause cracking and/or the slab bursting apart when later tempered. Once the slabs are casted, they are given a short time to cool to a simmering red glow, where they are then transported to a field outside of the steel mill. Where they will be inspected, and await further processing. Not all steel mills will cast standard issue 5ft by 40ft slabs for further processing. Mills will cast the steel into shapes that are relevant to the semi finished product they are producing. Since most steel mills in our nation produce sheet products, the molten mix is casted into rectangular slabs. To be molded and stretched into long, flexible sheets of carbon steel when shipped out to a hot strip mill. Step Three: Roughing and Finishing Processes The massive slabs produced by steel mills are shipped out to hot strips mills, where they will be turned into sheet products. The steel slabs are reheated to 2,400 degrees Fahrenheit, and descaled before running through a long process of roughing stands. Descaling is when the surface of a glowing metal is stripped or brushed off to detach any unwanted crust. The different roughing stands will roll, bend, stretch, and cool the steel along the way making it thinner and longer. The steel is rolled out and cooled down by blasting water at the end of the roughing process, then rolled into sheet coils. The once massive slab that was 40ft long and 5ft wide, is now a steel sheet thousands of feet long, but only fractions of an inch thick. The coils are then moved to the pickle line, where they are unraveled and submerged in an acid bath before being raveled back into a coil. This cleans any possible impurities and grim left on the steel after being proceeded through the factory and handled by machinery. At this point, the coils can be shipped off directly to customers, or undergo another specialized refinement. This could be cold rolling which makes the sheet even thinner, tinning which coats and polishes the surface of the sheet, annealing which makes the steel more malleable and easier to form. Or the most common process of tempering, where the steel is meticulously rolled out to add hardness, surface textures, and other special finishes. Steel: Atomic Structure Some people have wondered why we use steel instead of iron in our modern constructions, and it is for a multitude of reasons. The element (Fe) also known as iron, is very bendable, soft, and vulnerable to corrosion. The reason why iron and other pure metallic elements corrode is due to a redox reaction. Where simultaneously the metal is undergoing reduction and oxidation, which produces a corrosive by-product of FeO2H, also known as rust. Reduction is when atoms or molecules gain electrons, and oxidation is when atoms or molecules lose electrons. Iron is a strong anode which easily loses electrons, and oxygen is a strong cathode which gains them. And the reason why iron won’t rust in the open air is because an electrolyte solution is needed for the electrons to travel between the reactants. An electrolyte solution is a medium that contains ions that have either gained or lost electrons, and is also very conductive allowing electrons to travel through it at will. A common electrolyte and cause of corrosion in pure metals is water; natural water with small amounts of salt and other minerals mixed in it. When iron is alloyed with carbon, it becomes a very durable and semi redox resistant metal known as steel. Steel is anywhere from .7% to 2% carbon, and this element alloyed with iron has multiple benefits for construction. It has a higher tensile strength, higher durability, and although it is not immune to corrosion it is much harder for steel to rust even in contact with an electrolyte. Iron is malleable like most metals, and can bend without snapping or shattering to an extent given it’s tensile strength. However, steel not only has a higher tensile strength, but also has added compressive strength. Given it has carbon atoms intertwined within its atomic structure, re-supporting the iron atoms and not allowing electrons to escape as easily. Creating a very strong, even, lattice atomic structure. Physics of Steel and Sustainability Steel may not contribute much of a visual appeal in user experience when it is implemented into a building given that it is mostly utilized within, under, or behind other building materials. However, it is crucial in the sustainability and integrity of most buildings constructed today. The main purpose of steel is to give other building materials tensile strength. A very common building material known for having steel added to it is concrete. Concrete is a very useful and reliable construction material. It is very inexpensive to make, easy to mold/direct, and can withstand extreme amounts of compression. Although concrete is very durable compression wise, it has little to no tensile strength and is vulnerable when bent, twisted, or pulled. Which is why steel rebar is such a crucial component in sustainable concrete. When a body of solid concrete has a frame of rebar within it, it now has a high level of compressive and tensile strength. Although steel is less susceptible to corrosion, it is not immune to it and will still oxidize and rust over time. Which is why steel would not be a good building material by itself either. Which is where concrete plays an important role when constructing with steel. Although steel can oxidize when in contact with an electrolyte, concrete will not, eliminating the complication of a redox reaction within a building. Another important thing to note when a building is constructed, is the potential of the structural integrity being compromised and falling apart. Whether it is due to damage by impact, defective building materials, or by old age, all buildings will eventually fall apart. When concrete is not reinforced with rebar, it will have what’s known as a brittle failure. Which is an instantaneous break or split of the concrete when it occurs. When concrete is reinforced, it will have a ductile failure. In which the breaking of the concrete will not happen instantly, but rather slowly over time where a crack is visible at the point of compromise as seen in the image above. Allowing repairs to be made or action to be taken to prevent what would have been a catastrophe. Environmental Impact Although steel over the years has been proven to be reliable, fairly inexpensive, and one of the strongest possible building materials for withstanding tension. The cost it has on our environment and ecosystems is detrimental. When iron is mined from the earth, thousands of tons of earth is upturned, blown up, and scared from the process of extracting the metal. When an iron mine is abandoned, a massive quarry carved out of the earth is left behind, spanning up to a mile in diameter. Toxic minerals and metallic waste being upturned in the time of mining leaves the quarry as a wasteland of rock and iron ore that will take centuries for the area to recover from and inhabit plant life. Processing plants dump all of their tailings into basins that can go on for several square miles. Where green forests and lush fields of grass once were, are now covered in rock, clay, and iron dust. In order to make the high quality steel we produce today, it takes an extraordinary amount of energy. In the measurement of kilowatt hours, which is the power it takes to run one kilowatt for an hour. For comparison, a household usually runs through 30 kilowatt hours a day. It takes approximately 770 kilowatt hours to produce a ton of steel from the time it is smelted, to being ready for purchase. It takes an immense amount of nuclear fusion from our nuclear plants to generate this amount of power. Which inevitably leads to mass amounts of radioactive waste. In which the areas dedicated to having uranium tailings dumped will remain uninhabitable and dangerous to human health for thousands of years. And the CO2 SO2 emissions are fatal to our planet. When iron, coke, and limestone are smelted together, the limestone extracts and exfoliates the carbon dioxide and sulfur out of the metal. And these gases are released directly out of the steel mills, and into the open sky. The steel production industry world wide, produces over 3 billion metric tons of carbon dioxide every year. Making it the world's second largest greenhouse gas emission in industrial material production, right underneath cement. These mass amounts of carbon dioxide damage our ozone layer, produce acid rain, and permanently damage ecosystems worldwide. Over all, steel production is a very corrosive, and harmful process to our planet. And contributes unimaginable amounts of damage to our climate; some damage being irreversible. If an alternative to steel is not discovered soon, or if the carbon footprint it leaves behind does not shrink. The consequences will be fatal. |
Essential Questions
How does the structure of matter on the atomic, molecular, microscopic and macroscopic levels determine it's physical, chemical, and biological properties with emphasis on their use in building construction? How do the design of a building, selection of building materials, construction process and use of a building affect the over all sustainability of abuilding project and a user experience in the building. Reflection Questions
Question 1: What new information did you learn through doing this project? I am interested in 1-2 paragraphs summarizing your new understanding of your topic. I am particularly interested in your new understanding about the two Essential Questions(located at the bottom of this document). I am expecting more than general or vague statements like “I learned about steel/concrete" or “I learned how paint is sustainable”. Instead, explain what you learned like “I learned why steel is stronger when carbon is included….” or “I learned that composting reduces greenhouse gas emissions because….” I learned that there are multiple types of steel used for various structures and machinery, and a very specific, and refined process for carbon steel used in construction today. The reason we use steel for construction instead of iron or other plain metals is for a multitude of reasons. When you alloy iron with carbon, it increases the hardness, tensile strength, and immensely strengthens the yield point of the alloyed metal. And the introduced carbon atoms eliminate oxidation and erosion. When iron oxidizes, it creates rust on the surface that slowly seeps into the core of the metal which will weaken it eventually to the point of breaking. The reason iron rusts is because it is a very strong anode, meaning it easily releases electrons from its atomic body. And oxygen is a strong cathode, meaning it accepts electrons and extracts them. And some people wonder why iron doesn’t rust when it’s left out in the open air by itself, because there needs to be an electrolyte solution to connect the anode and cathode where the electrons can travel. Once this oxidation occurs, it creates hydrated ferric oxide, also known as rust. As more electrons are stripped from the metal, corrosion continues until it is no longer a stable structure. While carbon steel is not invincible to corrosion or oxidation like stainless steel. This alloy is implemented in structures where they are unexposed to the outside and serve as a strong rebar or frame. One of the primary uses being rebar for concrete. While concrete is incredibly strong, dense, immune to oxidation, and continues to strengthen the longer it’s around, it’s also very brittle. Which is where carbon steel comes in, and gives the concrete a strong yet slightly malleable frame. Giving the concrete stencil strength, and creating a highly durable structure.
This could include learning a new software program or new skills in a program you were familiar with, learning how to work better in a group or how you can avoid certain pitfalls of group work in the future, learning how to budget time or money on a project etc. Be specific and show the growth you made as a person/student through the work you’ve done. When I first was introduced to this project, I knew that I wanted to make something that wouldn’t be ridiculously over the top yet not like other work. So I decided to go the 3D route, where I could have the freedom to create and showcase whatever I want. At first I was thinking about making an animation of how steel is made and used in construction. But the more I was trying to study and learn animation, the more I was coming to terms with how long this was going to take. Animation is a rigorous and hour devouring project. And it was time that I just didn’t have. So about half way through Christmas break I decided to drop the idea of making an animation and was thinking of making 3D images of each primary step. I didn’t want to just showcase images of the 3D modes I created, because that would have been way too easy. So I did a bit of research, and found a website where I can showcase the 3D models or steps, to where someone could click on them and manipulate the images. Whether they wanted to rotate it, zoom in or out, look at the finer details. Even when you bring a whole animation into the equation, this was the most interactive and engaging option for the observers.
Specific feedback with concrete suggestions for improvement or about what aspects of the course to keep unchanged are most valuable to me. You are not being assessed on whether you say you liked this project. You are being assessed on the depth of thought your response displays, your specific claims and how you support them. You may or may not have already thought of this. But creating a portfolio of all of the previous work done for this project would be excellent. Not only would it be interesting for up and coming juniors who will do this next year. But it will give the class a chance to look at previous projects in hopes of getting inspired and generating ideas. Not to mention solving the main issue that almost everyone in my class had; judging the work load. Most of the juniors including myself felt very flustered and overwhelmed when introduced to this project. Because we are given a prompt, a month+ of work time, and Are questioning whether or not our idea is too little or too much. Having a portfolio of previous work would give students a good idea and mental boundary of what is expected of them. |
